- Choose a clear, even outdoor route or familiarize yourself with the treadmill controls and safety clip.
- Begin with an easy walk and gradually increase to a comfortable jogging or running pace.
- Keep your posture relaxed and use a pace you can sustain with control. On a treadmill, stay centered on the belt.
- Ease back to a walk to finish. Stop the treadmill completely before stepping off.
Jake Gyllenhaal: Roadhouse Upper Body Workout
55 min
·
8 exercises
It's time to craft the physique of a fighter! We're focusing primarily on working the muscles in your upper body, while hitting the core and cardio exercises that'll leave you looking like you're carved from granite.
Start out today's workout with a slow-paced mile run.
1:00 rest
3 quick rounds of shadow boxing to loosen up!
1:00 rest
Complete one set clockwise and one set counter clockwise.
1:00 rest
Aim to slowly lower your chest all the way down to the bar, pause for a full second, and then drive yourself back up explosively!
1:00 rest
Like with the push ups, aim to lower the weight slowly, pause at the bottom for a full second, and then explode upwards. Each rep should take around 4 seconds!
1:00 rest
Execute 15 reps per side per set!
1:00 rest
Burn out that core!
1:00 rest
Close out with some explosive pull-ups!
About this workout
Jake Gyllenhaal: Roadhouse Upper Body Workout is a free 55 min workout plan with 8 illustrated exercises for your abs, arms, back and cardio. Follow the workout online, save it to your WorkoutLabs Fit account or download it as a printable PDF.
Tap any exercise in the workout to see the muscles worked, clear exercise illustrations and step-by-step instructions. Each workout includes sets, reps, rest times and notes so you can follow the plan without guessing.
Workout details
- Duration: 55 min
- Exercises: 8
- Training focus: Abs, arms, back and cardio
- Format: Interactive workout and printable PDF
For more ready-made training plans, try WorkoutLabs Fit. You can follow visual workouts, build your own routines, manage your training calendar and track your progress. Sign up today to claim your free week.
Questions about this workout
How long does the Jake Gyllenhaal: Roadhouse Upper Body Workout take?
The full workout takes about 55 minutes, covering 8 exercises with prescribed sets, reps and rest periods. Using the built-in timers and auto-advance keeps you on pace from start to finish.
What muscles does this workout target?
This routine primarily works your quadriceps, abs, biceps, shoulders, triceps, glutes & hip flexors. Tap any exercise in the workout to see a muscle diagram showing exactly which primary and secondary muscles it activates.
How often should I do this workout?
For best results, do this workout 2–3 times per week with at least one rest day in between, and pair it with sessions that target other muscle groups.
Can I download or save this workout?
Yes – you can download this workout as a free printable PDF using the download button, or save it to a free WorkoutLabs Fit account to follow it on your phone, customize the exercises and track your progress.
Jake Gyllenhaal: Roadhouse Upper Body Workout
55 min
·
8 exercises
It's time to craft the physique of a fighter! We're focusing primarily on working the muscles in your upper body, while hitting the core and cardio exercises that'll leave you looking like you're carved from granite.
Cardio – Running / Treadmill


Start out today's workout with a slow-paced mile run.
Primary muscle group(s):
Quadriceps
Secondary:
Glutes & Hip Flexors, Hamstrings
Shadow Boxing


3 quick rounds of shadow boxing to loosen up!
Primary muscle group(s):
Abs, Biceps, Shoulders, Triceps
Secondary:
Calves, Glutes & Hip Flexors, Lower Back, Quadriceps, Shoulders, Triceps
- Stand tall with a tight core. Keep your gaze straight ahead. Bring your hands up to shoulder level. Make a tight fist with the thumb on the outside of your hand. Do not wrap your fingers around your thumb.
- Begin in a left lead stance. Your left foot should be in front. Your right foot should be behind. Throw a left lead jab by extending your left hand straight out in front of you and immediately retracting.
- Follow up the left jab with a right cross. Twist your foot and drive your right hip forward as you throw a straight punch with your back right hand. Alternate these two punches. Switch sides when finished with the prescribed repetitions.
Primary muscle group(s):
Abs, Obliques
Secondary:
Shoulders
- Sit comfortably with your feet grounded, knees bent, and body upright.
- Slowly lower your upper body backwards just enough to feel a strain on your abs.
- From here throw a desired amount of left and right eye-level punches.
Kettlebell Around the Worlds
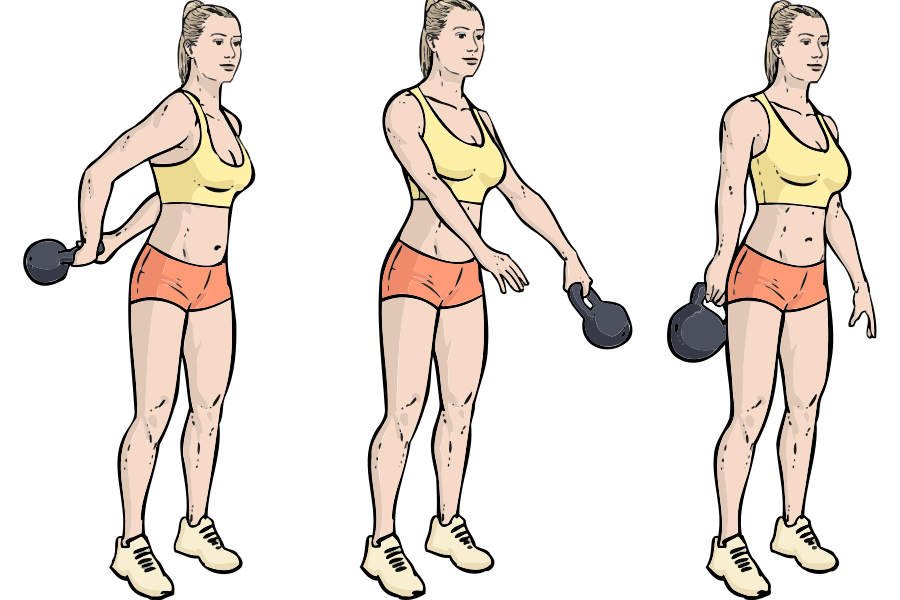



Complete one set clockwise and one set counter clockwise.
Primary muscle group(s):
Abs, Glutes & Hip Flexors
Secondary:
Middle Back / Lats
- Stand with your feet about shoulder width apart.
- Hold the kettlebell with both hands in an overhand grip in front of your pelvis.
- Keeping your core strong, rotate the kettlebell around your body changing hands in the front and in the back.
- Be sure to focus on your posture throughout the entire movement.
Primary muscle group(s):
Forearms, Neck & Upper Traps, Shoulders
Secondary:
Abs, Calves, Hamstrings, Quadriceps
- Place a pair of dumbbells or kettlebells at your feet. Brace your core and keep your chest up as you kneel down. Pick the dumbbells up, maintaining your form and keeping your gaze straight ahead.
- Standing up, walk forward in a straight line, holding the dumbbells at your sides.
- Choose a load you can carry with steady posture and a secure grip. Walk the planned distance, then set the weights down with control. Take a short break and repeat going back the other way.
Barbell Push-ups
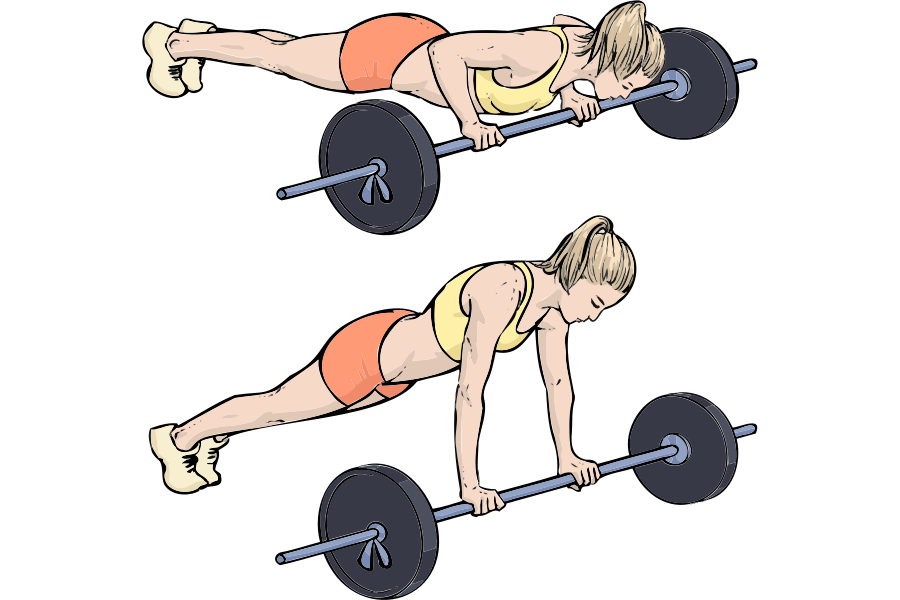

Aim to slowly lower your chest all the way down to the bar, pause for a full second, and then drive yourself back up explosively!
Primary muscle group(s):
Chest, Triceps
Secondary:
Abs, Shoulders
- Place a loaded barbell on the floor and place your hands at a slightly-wider-than-shoulder-width grip.
- Bracing your core, get into push-up position with a straight posture from head to heel.
- Lower your body down until your chest hovers about ½ an inch from the bar.
- Use a combination of chest and triceps power to push your body back up away from the bar.
Secure the bar so it cannot roll or slide before taking your weight on it. If it moves, stop and choose a stable push-up surface.
Primary muscle group(s):
Chest
Secondary:
Abs, Shoulders, Triceps
- Get into position by placing your hands flat on the floor, directly below your shoulders.
- Extend your legs out behind you, with only your toes and balls of your feet touching the floor.
- Hold your body up and keep your back straight by tightening your abdominal muscles.
- Keep your neck in line with your spine.
- Lower your chest towards the ground by bending your elbows until your chest is just above the ground or you feel a stretching of your chest and shoulders. Hold for a count of one.
- Press upwards from your chest and shoulders, straightening your arms as you return to the starting position. Hold for a count of one.
- Repeat.
Dumbbell Overhead Shoulder Press


Like with the push ups, aim to lower the weight slowly, pause at the bottom for a full second, and then explode upwards. Each rep should take around 4 seconds!
Primary muscle group(s):
Shoulders
Secondary:
Abs, Triceps, Upper Back & Lower Traps
- Sit on a military press bench or bench that has a back support, holding a dumbbell in each hand with an overhand grip.
- Place the dumbbells on top of your thighs with your palms facing down.
- Raise the dumbbells to your shoulders.
- Rotate your wrists so that the palms of your hands are facing away from you. This is the start position.
- As you exhale, push the dumbbells up and over your head by extending your arms until the dumbbells touch at the top of the movement.
- Pause for a count of one.
- Slowly return to the start position inhaling as you do so.
- Repeat.
This exercise can be performed standing or sitting on flat bench. For people with lower back problems, the version described is better.
Primary muscle group(s):
Chest, Shoulders
Secondary:
Triceps
- Holding a water bottle in each hand, stand straight, with your feet shoulder width apart.
- Raise the water bottles to head height by rotating your arms forward and up.
- Your triceps should be parallel to the floor and your elbows bent at 90 degrees. This is the start position.
- Keeping your back straight and using only your arms, extend through your shoulders and elbows to drive the water bottles straight up, exhaling as you do so.
- As your arms reach the fully extended position, bring them in towards each other until the water bottles touch lightly together.
- Hold for a count of one, while squeezing your shoulder muscles.
- In a controlled movement, return to the starting position, inhaling as you do so.
- Repeat.
Primary muscle group(s):
Shoulders
Secondary:
Abs
- Place your left foot onto the middle of a resistance band. Step forward with the right. Tighten your abdominals and avoid arching your back.
- Press the handles of the resistance band up and stop once your upper arms are parallel with the ground, making a scarecrow formation. The band should be behind your arms.
- Slowly press the resistance band overhead. Do not lock out the elbows. Lower to the starting position and begin again.
Standing Side Bends

Execute 15 reps per side per set!
Primary muscle group(s):
Obliques
Secondary:
Abs
- Stand straight, your feet shoulder width apart, while holding a dumbbell in your left hand with your palm facing in to your body.
- Place your right hand on your waist, palm facing in. This is the start position.
- Keeping your back and head straight, bend only from your waist to the right. Inhale as you bend.
- Continue as far as possible, then hold for a count of one.
- Return to the start position, exhaling as you do so.
- Repeat the movement this time bending to the left and returning to the start position.
- Complete all repetitions holding the dumbbell with your left hand before changing hands.
This exercise can be performed with a kettlebell or a plate weight.
Primary muscle group(s):
Obliques
- Lie on a padded surface on your left side. Stack your legs and bring your right hand behind your head. Lie your left arm in front of you or across your body. Brace your core.
- Pulling from the obliques, bring your elbow up and towards your feet. Do NOT pull yourself with your hand.
- Pause and feel the contraction in your obliques then slowly return to the starting position.
Decline Bench Crunches

Burn out that core!
Primary muscle group(s):
Abs
- Position yourself on a decline bench so that your feet are secured by the pads. Lay back and place your arms across your chest or behind your head.
- Begin the movement by pulling yourself up by your abdominals. Do not force yourself up by pulling on your neck. Let your abs do all the work.
- Once at the top, slowly lower yourself back down. Again, focus on the abs doing all of the work. Repeat by bringing yourself back up.
Primary muscle group(s):
Abs
Secondary:
Glutes & Hip Flexors
- Lie face up on with a medicine ball between your hands and your arms extended behind you. Keep your arms and legs straight and then raise your feet an inch off the floor.
- Raise your torso and legs up at the same time and touch the medicine call to your feet. Hold for a moment.
- Lower down to starting position with arms and ball behind your head.
Primary muscle group(s):
Abs
Secondary:
Glutes & Hip Flexors
- Lie flat on an exercise mat, extending your arms straight back behind your head.
- Fully extend your legs also. This is the start position.
- Bend at your waist and at the same time, raise your legs and arms to meet in a closed jackknife position. Exhale as you do this.
- At this point, your legs should remain fully extended at between 35-45 degrees from the floor.
- Your arms should be fully extended, parallel to your legs.
- Your upper body should be raised off the floor.
- Return to the start position by lowering your arms and legs back to the floor, exhaling as you do so.
- Repeat.
Pull-ups


Close out with some explosive pull-ups!
Primary muscle group(s):
Middle Back / Lats, Upper Back & Lower Traps
Secondary:
Biceps, Forearms
- Standing under a pull-up bar, reach up and hold onto the bar with an overhand grip. Make sure your hands are about twice your shoulder width apart.
- Keep your arms straight and hang from the bar so that your arms are taking all of your weight.
- Keeping your body straight and not swinging your weight, pull your body up towards the bar by pulling your elbows down towards your torso at an angle.
- Continue lifting until your chest is nearly touching the bar. You should feel a “squeeze” at the base of your lats (about midway down your back and to the side) as they contract.
- Once your lats have completely contracted at the top of the movement, slowly lower your body to the starting position.
- Repeat.
By using a wide grip, your lats are doing most of the lift, rather than your biceps. It doesn't matter if you keep your legs straight or bent at the knees with your feet crossed. The important thing is that you do not use your legs to assist in lifting your body weight. As your strength increases, you can add weight by using a weight belt.
Workout done!
Exercises done
of 8
Total time
Access 1000+ more workouts, build your own plans and track progress with Fit
Start my free week
Free 7-day trial • No charge today
We're not done yet!
Exercises done
of 8
Approx. time left
32:15
You can switch gender of illustrations here
Got it
Swap that with...
What's new
Recently added
- Copy calendar contents between clients (Jan 19)
- Disable messaging for individual clients (Jan 19)
- Sort your client list in a few practical ways (Jan 19)
- Message multiple or all of your clients at once (Jan 17)
- 10 new exercises (Jan 10)
- Sidebar 'notepads' for privates notes (Dec 23)
- Supersetting functionality (Nov 22)
- 15 new exercises (Nov 12)
- Clients can now move workouts (Nov 7)
- 15 new exercises (Oct 10)
- 9 new exercises (Sep 14)
- 10 new exercises (Aug 30)
- Share workouts on Instagram and browser notifications (Aug 29)
Coming soon
- Your branding in client email notifications
- Share workouts on Pinterest
- Tools and resources to help you find new clients
Get more updates on Twitter
Uh oh! 5 workouts in your calendar will be permanently overwritten. Proceed?
The 5 mile run at the park with Mary custom activity will be deleted. Proceed?
Permanently delete ALL FUTURE WORKOUTS and activities in your calendar? This cannot be undone.
You've used your
5 free workouts limit. Start a free 7-day Fit trial to keep training, save workouts and build your own plans 👍
5 free workouts limit. Start a free 7-day Fit trial to keep training, save workouts and build your own plans 👍
Free 7-day trial • No charge today
Committed? Upgrade to yearly and save 25%!
Our yearly subscription is only $89.95 – $29.45 less than paying monthly*. That’s only $7.49/mo!

*$9.95/mo x 12 months = $119.40
OMG YES! Switch to yearly

, join thousands of users worldwide!
★★
★★
★★
★★
★★
4.5 user rating
Enjoy hundreds of workouts
or edit and create your own
Follow simple illustrations
with videos and written instructions
Manage your calendar
to get fit on your schedule
I'm committed 💪
$89.95
per
year
year
Comes to $7.50/mo
Save 25%
Best value &
popular option
popular option
One step at a time
$9.95
per
month
month
billed monthly
Where should we send
the workout link? 📲
the workout link? 📲
We’ll never call or send spam, and your number will
remain private. 🔒 or view the workout here
remain private. 🔒 or view the workout here
We’ll never call or send spam, and your
number will remain private. 🔒
number will remain private. 🔒
Delete forever?
Yep, toss it!